Login / Register
Change Your Country

New Alco-Sensor III Accuracy Check Procedure

These instructions are for an Accuracy Check procedure for Intoximeters new style Alco-Sensor III. If your instrument has a serial number equal to or greater than 1200000 you should follow this procedure.

An Accuracy Check should be performed periodically. The frequency should be determined by your Quality Assurance Program.

Below are basic Accuracy Check instructions for the Intoximeters Alco-Sensor III breath testing instrument.

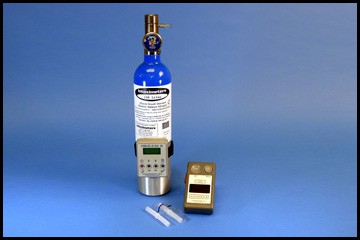
Tools Required: Before beginning have these items available: instrument, calibration standard, new mouthpiece.

Alco-Sensor III Accuracy Check Procedure Part 1
  • Dry Gas Standard & Regulator
  • Alco-Sensor III
  • New Mouthpiece
  • True-Cal, True-Cal II or Elevation Chart

Note: A calibration standard can be a:

  • Mini-Alco Can (for non-evidentiary testing applications only),
  • Dry Gas Cylinder and Regulator
  • Wet Bath Simulator and Solution
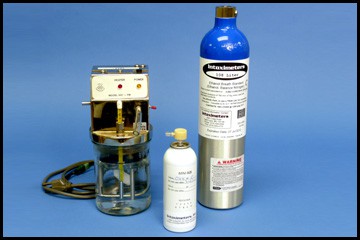
For this demonstration, a dry gas cylinder is used as the standard – value (at sea level) of.082%.

  • A True-Cal device was used to give the true value of the standard at the time of our demonstration
  • the True-Cal will display an adjusted, or expected, gas value for the current atmospheric pressure
  • Therefore, the target value for this demonstration is .081


True-Cal displays .081

Alco-Sensor III Accuracy Check Procedure Part 2
Alco-Sensor III (serial # > 1200000)

  1. Check temperature of the Alco-Sensor III by depressing the READ and SET buttons at the same time. Be certain that the instrument temperature is between 15°C and 36°C. RELEASE READ button, SET button should remain depressed. (Note: The firmware version and revision designation will be displayed following the instrument temperature).

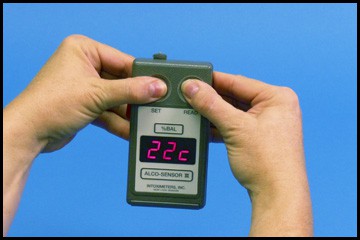
Temperature window display
  1. Depress and release the READ button, .000 should be seen in the dim mode and then in the bright display mode before continuing on with the test procedure.

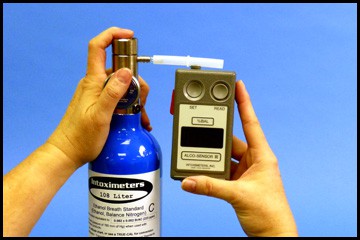
READ button depressed
ASIII displays .000
  1. If .000 is not seen in the bright mode within 6 to 8 seconds, depress SETbutton and recheck in one minute. (Follow Step 2 again. The unit must display .000 for 5 to 10 seconds before proceeding with the Accuracy Check).
  2. Depress SET button on Alco-Sensor III.
  3. Attach a clean, dry mouthpiece

SET Button Pressed
  1. Follow instructions on the dry gas standard to mount the regulator if it has not already been installed.
  2. If this is the first test from the dry gas standard today, purge the regulator by depressing button/valve on regulator for approximately 3 to 4 seconds.
Alco-Sensor III Accuracy Check Procedure Part 3
Alco-Sensor III (serial # > 1200000)

  1. You should know the expected value of the standard – this will be used to compare against the actual result determined by the instrument.

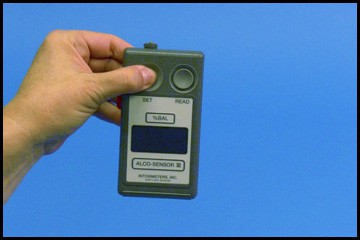
True-Cal device displays .081. This is the expected value of the Standard used for this demonstration


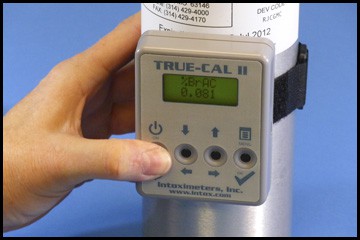
Expected value = .081
 

  1. Carefully attach Alco-Sensor III to mouthpiece assembly
  2. Submit a gas sample from the standard to the Alco-Sensor III for at least six (6) seconds. On the 4th or 5th second of the six second count, depress and release the READ button.


(NOTE: The vapor must be flowing through the mouthpiece when the READbutton is depressed and it is suggested that it flow for at least one second after the READ button has been depressed).


Submit a gas sample

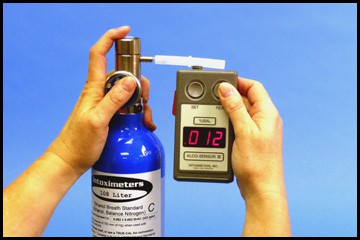
READ button is depressed
 

  1. Carefully detach the Alco-Sensor III from the standard and observe the displayed reading until it becomes stable and bright. This is the final result.
  2. The difference between the final result and the expected value of the standard should be within the tolerance allowed in the Quality Assurance Plan set for your program.
  3. If the difference is greater than the specified tolerance, the unit requires a calibration adjustment.  (Follow the instructions for CALIBRATION).
  4. The expected value of the standard used for this demonstration was .081, so our result of .080 is within an acceptable tolerance

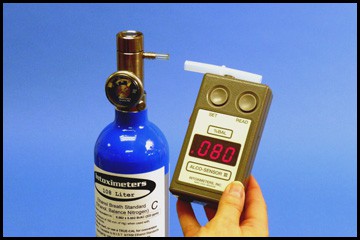
Observe final reading 


To demonstrate compliance with your program’s QAP it is best to keep a record or a Calibration Log for each device used for testing. The log should contain the results of all accuracy checks and calibrations for each instrument. This log may become a crucial piece of evidence should your test results be challenged. The log may include information such as:

  • Date
  • Time
  • Procedure performed (Accuracy Check or Calibration)
  • Name of Technician performing procedure
  • Location
  • Identification of the Standard including Lot Number of the Standard
  • Expected Value of the Standard
  • Result of the Accuracy Check or Calibration

For more information about procedures for your Intoximeters instrument, please refer to your

  • Operator’s Manual
  • or email Intoximeters Tech Support.
  • or phone the Technical Support Department at 314-429-4000
0

Your Cart